An easy-to-follow step-by-step guide with a list of UK Curly Girl Method approved products.
The Curly Girl Method can transform your frizzy, unruly hair into beautiful bouncy curls in no time. In this post, I’m sharing my easy step-by-step guide to the Curly Girl Method for UK followers.
And if you’re not sure if the CG method is for you, then simply check out my results:
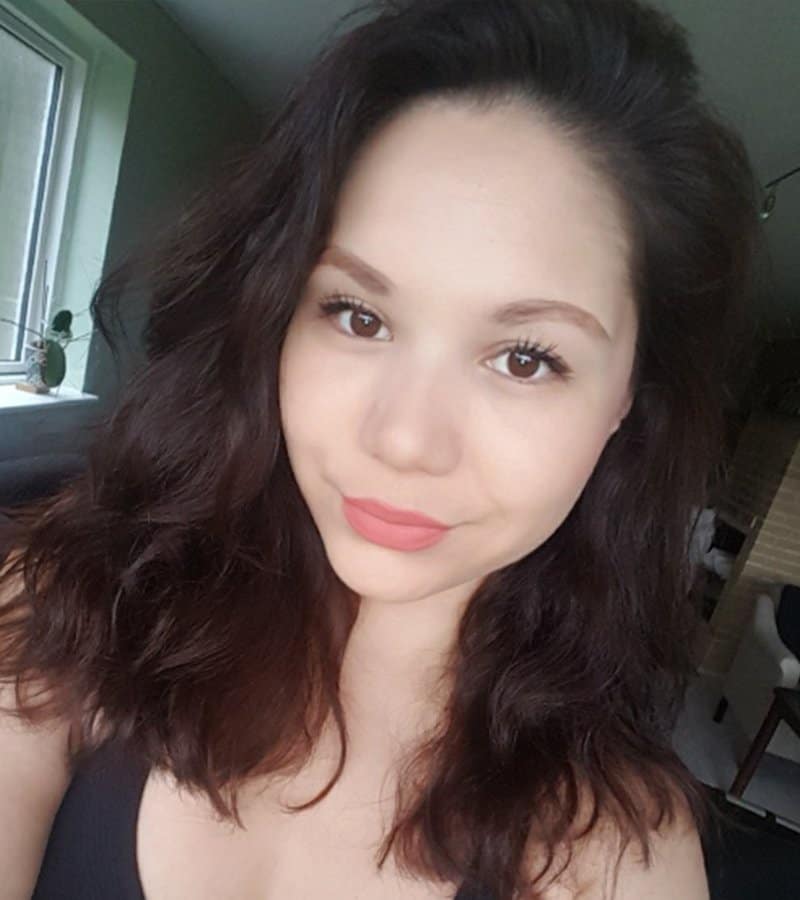
Before the Curly Girl Method

After the Curly Girl Method
This post contains affiliate links and we may earn if you click on them (at no extra cost to you). Please read our full disclosure policy here.
The method at first may seem daunting, particularly because there are only certain products that are Curly Girl friendly.
If you live in the UK, how do you know what these are? I’ve got you covered. In this step-by-step guide for the Curly Girl Method, I’ll also be revealing my favorite products which you can buy right here in the UK.
What Is The Curly Girl Method?
The Curly Girl Method is based on Lorraine Massey’s book Curly Girl – The Handbook which encourages you to follow a hair care regime that will naturally enhance and create soft and bouncy curls.
The general idea is that you avoid using certain ingredients such as sulfate or silicone which are often found in your shampoo or conditioner.
Sulfate dries out hair and silicone coats your hair in a wax-like substance.
Instead, the Curly Girl Method (CGM) encourages you to co-wash. Co-wash is short for conditioner-only washing and it means to wash your hair with conditioner ONLY.
After washing your hair with a UK CG-approved conditioner, you squish your curls while they’re still soaking wet and apply gel to lock in the moisture.
You then let your curls air-dry or use a diffuser to speed up the process.
Once your hair is dry, the gel will have formed a cast around each curl and you then break this cast by ‘scrunching’ your hair to reveal soft, bouncy curls.
That’s the Curly Girl Method in a nutshell.
The Curly Girl Method rules
1. No sulfates, silicones, drying alcohols, or parabens
2. No heat styling, brushing, or towels that can dry or damage your hair.
3. Co-wash only.
The reason shampoo is discouraged on the CG method is that most shampoos contain sulfate detergents to get rid of dirt and build-up.
Sulfates are essentially what makes shampoo lather and give it that bubbly effect.
Sulfate is a harsh chemical that only provides you with short-term solutions (so you keep using shampoo over and over again) and strips your hair of its natural oils.
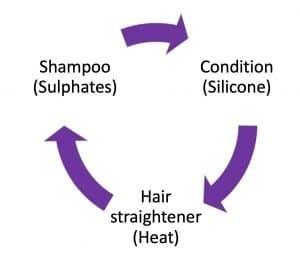
When you skip shampoo completely, your hair will no longer be damaged by the use of sulfates and your curls will come to life like never before.
You are therefore encouraged to use conditioners that are silicone-free.
Silicone is non-soluble which means that it can’t be washed off with water. Hence, we need to use sulfate shampoo to clean our hair.
The Curly Girl Method helps you break this cycle and by using products that are not as harsh but still effective, your curls will be allowed to form and flourish as they should.
The Curly Girl Method UK: Easy Step-by-Step Guide
The CG Method has literally transformed the condition of thousands and thousands of curls and if you are 100% committed to trying the method, you will see incredible results.
However, each curly strand is different, which means that your journey towards healthy hair will be different from everyone else.
You will need to invest time in the method as well as find the right products for you and my aim with this guide is to make the process as easy for you as possible.
Let’s get to it.
Things you will need
- Curly Girl Method approved conditioner
- Microfibre towel or an old T-shirt
- A hairdryer
- Curly Girl Method approved hair gel
Optional
- Diffuser
- Scalp massager
To make it as easy as possible I have divided the guide into two sections. The essential steps and the additional steps. Once you become comfortable with the basics, you can try out the additional steps.
Essential steps:
- Co-Wash
- Conditioning
- Styling
- Drying and Diffusing
- Scrunch Out The Crunch (SOTC)
Additional steps:
- Curl activators and Mousse
- Plopping
- Clarifying
- Deep Condition
- Refresh
Step 1. Co-Washing
The first step of the Curly Girl Method is co-washing. Shampoo is not recommended as this can strip your hair of natural oils which are crucial to both hair and scalp health.
You will need
- A Curly Girl friendly conditioner
- Scalp massager (optional but really useful)
Instructions
1. Step into the shower with your Curly Girl approved conditioner.
2. Completely saturate your hair with water. Water is our friend and curls need constant hydration in order to form.
3. Squeeze a generous amount of conditioner into your hand and use it to wash your hair as you would with shampoo. You’ll need more than you think so don’t be shy.
4. For a better cleanse, use a scalp massager to remove build-up and grease.
You won’t get the lathering effect you get with shampoo and you won’t get that ‘squeaky clean’ feeling, but remember that this is because the natural oils in your hair are retained.
Recommended Products For Co-washing (Available in the UK)
You can use the same conditioner for co-washing and conditioning, but I like to switch between two.
My favorite UK Curly Girl approved conditioners for co-washing are Faith In Nature Aloe Vera Conditioner and Garnier Ultimate Blends Banana Hair Food and I just get mine from Amazon.

Faith In Nature Aloe Vera Conditioner
[amalinkspro type=”cta-btn-css” ctabtn-id=”6″ asin=”” apilink=”https://www.amazon.com/dp/B000NHJLHI?tag=supinda-20&linkCode=osi&th=1&psc=1″ addtocart=”false” new-window=”true” nofollow=”true” alignment=”aligncenter”]Check Price on Amazon[/amalinkspro]

Garnier Ultimate Blends Banana Hair Food
[amalinkspro type=”cta-btn-css” ctabtn-id=”6″ asin=”” apilink=”https://www.amazon.com/dp/B07L5WGS2X?tag=supinda-20&linkCode=osi&th=1&psc=1″ addtocart=”false” new-window=”true” nofollow=”true” alignment=”aligncenter”]Check Price on Amazon[/amalinkspro]
Faith In Nature has a lot of CG friendly conditioners. What I like the most is that they are very budget-friendly. I definitely don’t think you need to spend a fortune to follow CGM.
This conditioner is great for co-washing, is super lightweight, and adds a lot of moisture to my hair.
Although the Hair Food conditioner is technically a hair mask, it’s so light in its consistency that it works perfectly as a co-wash too.
Just look at the reviews on Amazon and you’ll see how popular a product this is.
Another good thing about these two products is that they’re available in most UK stores like Boots or Superdrug and they won’t break the bank.
Don’t be fooled into thinking you have to spend £15 on a bottle of conditioner. Some products are worth it but I’d save that money for deep conditioners.
If you want to try different conditioners, you can always check out my list of Curly Girl approved products.
For the scalp massager, I found this one on Amazon which really does the trick. Make sure you spend at least a few minutes cleaning your hair.

FREATECH Scalp Massager
[amalinkspro type=”cta-btn-css” ctabtn-id=”6″ asin=”” apilink=”https://www.amazon.com/dp/B077PQB2HC?tag=supinda-20&linkCode=osi&th=1&psc=1″ addtocart=”false” new-window=”true” nofollow=”true” alignment=”aligncenter”]Check Price on Amazon[/amalinkspro]
Step 2. Conditioning
After co-washing, it’s time to condition.
A term you may come across when following CGM is ‘squish to condish’.
‘Squish to condish’ is a termed coiled by Melissa Stites and it basically means that you are ‘squishing’ water and conditioner together in order to hydrate your hair when conditioning your hair.
By ‘squishing’ your curls using your hands, you’re essentially allowing your hair to drink as much water as possible and lock it in by using the conditioner as a seal.
You can see now that your previous regular routine of applying conditioner for a minute or two and then rinsing it all out seems pointless. We want to force water and product into the hair.
You will need
- Curly Girl approved conditioner
Instructions
1. After co-washing, apply a generous amount of conditioner to your hair. With your hair flipped over forwards, collect the dripping water and conditioner coming out your hair into the palm of your hands.
2. Use this mixture of goodness to ‘plop’ your curls and squish them back towards your scalp.
3. Keep adding more water and keep squishing your hair. It should sound very ‘soppy’ and you’ll start to see your curls form and frizz decrease.
If your hair feels dry or it is frizzing, add more conditioner.
4. Keep scrunching your hair until it is no longer dripping and then begin to wash out the conditioner but leave a bit for softness.
I found the best results are when I saturate my hair in warm water, flip my hair upside down and rinse through with cool water. My curls are simply bouncier and form much quicker.
I then direct the showerhead back to my body and change the temperature back to warm.
Recommended Products For Conditioning (Available in the UK)
I prefer creamier textures for conditioning as they provide the highest level of hydration.
My favorite UK conditioners are the Garnier Yoghurt Mask, SheaMoisture Coconut And Hibiscus conditioner, and the Giovanni Smooth As Silk Conditioner.
All three conditioners are very affordable and leave my hair feeling soft, shiny, and moisturized.

Garnier Almond Crush Conditioner
[amalinkspro type=”cta-btn-css” ctabtn-id=”6″ asin=”” apilink=”https://www.amazon.com/dp/B07G8QBCLC?tag=supinda-20&linkCode=osi&th=1&psc=1″ addtocart=”false” new-window=”true” nofollow=”true” alignment=”aligncenter”]Check Price on Amazon[/amalinkspro]
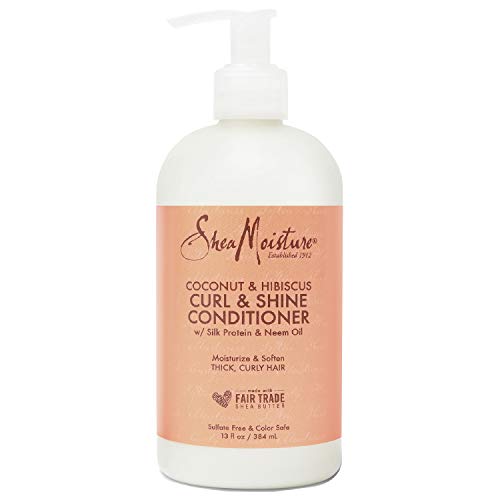
SheaMoisture Coconut And Hibiscus conditioner
[amalinkspro type=”cta-btn-css” ctabtn-id=”6″ asin=”” apilink=”https://www.amazon.com/dp/B00EUMC62O?tag=supinda-20&linkCode=osi&th=1&psc=1″ addtocart=”false” new-window=”true” nofollow=”true” alignment=”aligncenter”]Check Price on Amazon[/amalinkspro]

Giovanni Smooth As Silk Conditioner
[amalinkspro type=”cta-btn-css” ctabtn-id=”6″ asin=”” apilink=”https://www.amazon.com/dp/B000YDX0LO?tag=supinda-20&linkCode=osi&th=1&psc=1″ addtocart=”false” new-window=”true” nofollow=”true” alignment=”aligncenter”]Check Price on Amazon[/amalinkspro]
Step 3. Styling
One of the key secrets to having soft, bouncy curls is to apply gel to wet hair.
It may seem counterproductive at first, but locking in the moisture of each strand is essential if you want non-frizzy hair.
By applying gel to each curl, you’re going to create a cast that will harden once dry and allow the curl to keep its shape whilst still retaining its softness and bounce.
The gel cast will also protect your hair from outside factors such as wind and humidity and if you take care of how you sleep at night, you could keep your curls fresh and lively for up to one week without having to do a co-wash.
After applying gel, you need to let your hair dry completely and then you ‘break’ the cast to unleash your curls.
This is also called ‘Scrunching Out The Crunch’ (SOTC).
You will need
- Curly Girl approved gel
Optional
- Microfibre hair towel or T-shirt
- Root clips
Instructions
1. Immediately after conditioning, flip your hair forwards and apply a generous amount of gel to your hair, using the same cupping and squishing technique to form big clumps of curls.
2. Try and get big clumps of curls. The bigger the clumps the better!
This ensures lovely soft curls rather than stringy limp strands.
Start out by using a small handful of gel and use more if you think it’s not enough. You will need more than you think.
3. As you apply the gel, your curls will take their final shape. Squeeze out any excess water but don’t overdo it. The dryer your hair is when styling, the frizzier your hair will be.
Note: Some like to apply gel to dripping wet hair whilst others like to dab their hair first with a t-shirt or micro-fiber towel.
The wetter your hair, the longer it will take to dry of course.
You’ll need to find the best way for you, but eventually, the healthier your hair is, the less wet it will need to be when you apply the gel.
3. Once every curl has been generously covered in gel, you can now choose to pin up your curls with root clips at the top of your head.
The reason why many people choose to do this, is because the gel can weigh the hair down substantially, especially if you have long hair.
Although your hair doesn’t weigh a lot, product build-up can significantly reduce the volume of your bouncy locks.
Curls thus find it harder to form on top of your scalp and you may not end up with your desired look.
Personally, I rarely use clips as I move straight onto drying but you should do what gives you the best results.
If you want to lift the roots of your hair, flip the curls to the opposite side of your parting. This way, your roots will stand up once dry instead of lying flat on your head.
Recommended Products For Styling (Available in the UK)
There are many UK Curly Girl-friendly gels that you can use on the CG Method.
Most gels will do the trick as long as they don’t contain drying alcohols. You don’t want your hair to lose moisture.
Like with any other step of this guide, I urge you to experiment with the products you use but my favorite two gels which I get from Amazon are the Umberto Giannini Scrunchy Jelly or the Eco Styler gel.
Both of these have excellent holds, they’re affordable and last quite a long time. They also don’t leave any white flakes which can be a problem with other gels.
The Eco Gel is a Curly Girl UK favorite. It is affordable and I think it is the best starter gel.

Eco Styler gel
[amalinkspro type=”cta-btn-css” ctabtn-id=”6″ asin=”” apilink=”https://www.amazon.com/dp/B003E7UNE4?tag=supinda-20&linkCode=osi&th=1&psc=1″ addtocart=”false” new-window=”true” nofollow=”true” alignment=”aligncenter”]Check Price on Amazon[/amalinkspro]
It has a strong enough hold to give a cast for most hair types and it doesn’t leave any white residue on your scalp. If you’re new to the Curly Girl Method, this should be your go-to.
If you want to invest in a premium gel, look no further than Umberto Giannini’s Scrunching Jelly or Boho Jelly. You may already have heard about them and rightly so.

Umberto Giannini Scrunchy Jelly
[amalinkspro type=”cta-btn-css” ctabtn-id=”6″ asin=”” apilink=”https://www.amazon.com/dp/B01MU1R2P9?tag=supinda-20&linkCode=osi&th=1&psc=1″ addtocart=”false” new-window=”true” nofollow=”true” alignment=”aligncenter”]Check Price on Amazon[/amalinkspro]
Although they cost a bit more than your regular drugstore gel, both gels have an incredible hold and smell amazing.
They are Umberto Giannini’s best-selling products and have fantastic review scores on Amazon.
You can also use mousse and sprays if you prefer. Check out my article on the best UK Curly Girl Approved styling products for more.
Microfibre Towel
I got my cheap microfibre towel from Amazon. This one is big enough to wrap all my hair in. With this particular product, you get two towels that will last you throughout the week.

2 Pack Absorbent Microfibre Hair Towel Turban
[amalinkspro type=”cta-btn-css” ctabtn-id=”6″ asin=”” apilink=”https://www.amazon.com/dp/B07GWPTWYL?tag=supinda-20&linkCode=osi&th=1&psc=1″ addtocart=”false” new-window=”true” nofollow=”true” alignment=”aligncenter”]Check Price on Amazon[/amalinkspro]
If you don’t want to spend money on a microfibre towel, just use an old t-shirt.
Step 4. Drying and Diffusing
After applying gel to your hair, it now needs to dry so that your hair will form a hard cast around your curls which you will then break once your hair is dry.
Remember, the goal here is to keep your curls as defined as possible, avoiding outside factors such as heat or blowing air as much as possible.
The less the hair is disturbed, the better the cast will be.
You have two options when it comes to drying – air drying or diffusing. There are pros and cons to each method:
Air drying
Pros: More defined curls, less frizz
Cons: Longer drying time, Less volume
Diffusing
Pros: Shorter drying time, More volume
Cons: More frizz, Less defined curls
Airdrying
Airdrying is pretty straightforward. It’s best to ensure that you’re not running around or going outside for example. The more you can leave your hair alone, the less frizz you’ll experience.
Airdrying your curls can take a few hours and is best suited for days when you don’t have to go to work.
It can be worth it though as airdrying your curls often produce a smoother frizz-free result.
However, if you don’t have three hours to spare in the morning, then diffusing is for you.
What Exactly Is A Diffuser?
A diffuser is an essential tool when you’re following the Curly Girl Method.
It can be cone or hand-shaped. They both have a lot of small holes throughout to allow for air to disperse whilst gently drying your curls.
It allows your curls to dry much quicker than when air drying and adds a lot more volume.
What Diffuser Should I Use?
You probably already have a hairdryer, but do you have a diffuser?
It’s a must if you’re planning on washing your hair in the mornings or if you’d like your routine to take less than two hours.
Luckily, we UK followers of the Curly Girl Method have plenty of choices when it comes to diffusers.
I use the Hairizone diffuser which I got from Amazon and I honestly think it’s one of the best ones on the market.
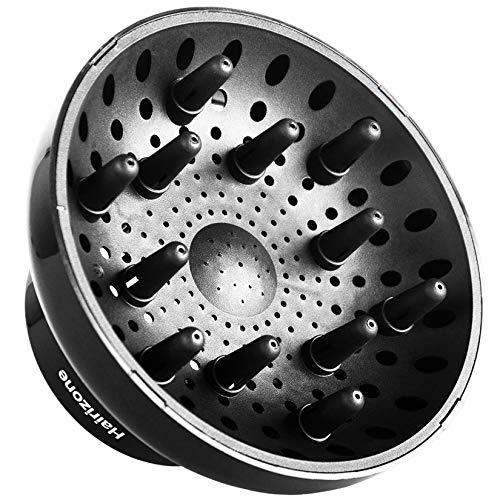
Hairizone Universal Diffuser
It’s cheap, and durable and it fits onto pretty much any hairdryer!
It is a favorite amongst UK Curly Girl Method followers and is great if you have long curly hair.
This diffuser allows you to cup your hair into the cone and dry your longer curls in a much shorter time.
You can also get a hand-shaped diffuser from eBay which is lightweight and fits onto your scalp very easily.
This is a great tool for creating volume and drying the base of your hair more quickly. It’s a cheap piece of plastic, yes, but it really does the trick!
I personally own both diffusers because I like to alternate between the two but it’s completely up to you to decide which one you find most useful.
How To Diffuse Curly Hair
You will need
- Hairdryer
- Diffuser
Instructions
1. Attach the diffuser to your hairdryer. Make sure your hairdryer setting is set to cool or medium warm. Never use maximum heat.
2. Hover the diffuser around your scalp to dry this first as much as possible. Avoid touching your curls at this point.
2. Once your scalp feels fairly dry, begin to hover the diffuser around your curly locks. Bend your head down sideways or even upside down.
Diffusing can take a fairly long time so be patient.
For best results, use a cool setting. This will prevent your hair from drying out, prevent frizz and loss of curls and although your hair will take longer to dry, the results will be better.
You should never diffuse your hair more than 90%. Let it cool and set before breaking the cast.
You can also use different tools and products to help maximize the effects of a diffuser.
I sometimes use Pantene V5 mousse for even more volume on the top of my head, or you can use clips such as these from Amazon to lift the roots.
Step 5. Scrunch out The Crunch (SOTC)
Once your hair is completely dry, it is time to remove the crunch of the gel cast to release the hair from the protective barrier.
Simply flip your hair forwards and break the cast by lightly scrunching upward using either just your hands or a t-shirt for a softer approach.
I usually have to take my finger into my hair to reach my scalp. This helps to release the gel while lifting from the scalp to give my hair height.
You not only end up with softer curls but fully moisturized, frizz-free curls that can give you second, third, or even fourth-day hair.
A few tips:
To sort out fly-away hairs or frizz, use a water-based lube (yes I said it…) to help smooth out your curls.
You’ll be surprised at how effective it is!
But that’s it! That’s the basics of the Curly Girl Method.
If you can master these steps then you should be absolutely fine to move on to the additional steps.
Curl Activators and Mousse
Many CGM followers use curl activators after co-washing to enhance the bounce of their curls.
My personal favorite curl activator is the Cantu Curl Cream which you can buy from Amazon.
You only need a pea-sized amount for each application and make sure you rub the product thoroughly between your hands before applying.
The best way to apply the product is to use the praying technique which is to gently cover each curl with the product between your palms as you move from roots to ends.
Be gentle and if you see any signs of frizz, try and smooth it out with your hands. You can then squeeze each curl again after using the praying method.
Check out my other post on Curly Girl Approved Cantu Products
Now, some followers also like to use mousse instead of gel or even together with gel. It’s really up to you.
Mousse can sometimes help with adding more bounce to your curls but it can also be drying.
The only way you’ll find out if it’s for you, is to try for yourself.
If you’d like to try a mousse, I would recommend this Pantene mousse which I found on Amazon. It’s a big bottle and it has a great hold.
Plopping
Plopping is the process of gently wrapping your hair in a t-shirt or microfiber towel after co-washing to allow your wet curls to keep their bouncy shape.
This can be done before or after you have applied gel to your hair.
It can also help lift your curls at the roots which is key on the Curly Girl Method as the products you use can make your hair quite heavy.
But I’ll be honest, I don’t always ‘plop’.
I find that the Curly Girl Method can take a lot of time and on days when I just want to get on with it, I co-wash, remove excess moisture from my hair and move straight to styling and diffusing.
Now plopping in itself doesn’t actually take a lot of time but I tend to just wrap up my hair in a microfiber towel for about 5 minutes while I get changed and apply make-up.
This is sort of plopping but without technique…and this is the key!
If you do have the time, I definitely recommend that you plop.
There is a big difference between wet and dry hair and frizz happens in that crucial ‘in between’ period.
Furthermore, the root lift you get from plopping really can be the make or break of your curls.
As mentioned in the beginning, one of the rules of this Curly Girl Method UK: An Easy Step By Step Guide is no towels.
Normal towels create frizz and you should be using old t-shirts or investing in a microfiber towel for the absolute best results.
The reason for this is that normal cloth towels will remove too much moisture from your hair, and curly hair needs moisture.
The fibers of traditional cloth towels can ruin your hair cuticles and you need to be gentle.
How to Plop
1. Lay your t-shirt or microfiber towel on a flat surface (bed/toilet seat/ table) with the sleeve ends closest to you.
2. Place all of your hair at the center of the towel with your head bent down, so you’re kind of standing over the t-shirt.
Begin to wrap your hair in the t-shirt, starting with the fabric at the top of your hair
3. Fold the T-shirt around your hair and use the sleeves of the t-shirt to tie behind your head.
All of your hair should now be covered in a sort of turban shape and all of your lovely curls carefully placed on top of your head.
You can now choose to leave your hair like this for as long as you want until you’re ready to use gel or dry.
I normally give it 10 minutes while I get changed and do my make-up and then I apply gel. Your hair should still be fairly wet.
Some Curly Girl followers will apply the gel before plopping, but I honestly find that my hair will not dry if it’s not ‘set free’.
You can experiment however you like and see what suits you.
The T-shirt is meant to soak up moisture from your hair without any outside interference which means less frizz whilst drying, but I personally think that air drying or diffusing works best.
If I use gel before I plop, I also find that the product leaves my hair and I can never get a proper cast.
You May Also Like:
- Does Sulfate-Free Shampoo Cause Hair Loss?
- Benefits of Sleeping in a Silk Cap
- The BEST Apple Cider Vinegar Rinse For Curly Hair
Clarifying
One of the terms you may have heard when reading about the Curly Girl Method is ‘clarifying’.
It means to clear your hair from product build-up and general dirt and it has been associated with low poo shampoos for quite a while.
If you are familiar with the CG method, you’ll know that Low Poo shampoos are not CG friendly.
They contain lather which is produced by harmful lathering agents and so even though low poo shampoos do not contain sulfates, they are still off-limits.
If you do feel that your hair needs a thorough clean and co-washing doesn’t seem to get rid of build-up, consider doing a cleanse with a UK Curly Girl approved shampoo that doesn’t contain sulfates.
You must still use a non-lathering product and my favorite is the Coconut CoWash Cleansing Conditioner.
This cleanser is specifically formulated for curly hair types and cleanses scalp and hair without stripping moisture and essential oils.
You can also try an ACV rinse which is essentially a few spoonfuls of apple cider vinegar mixed with a cup of water.
Add the mixture to soaking wet hair and massage for a few minutes. This clarifying mixture will help naturalize the PH balance of your hair and remove any product build-up.
A great alternative to using chemicals!
Deep Condition
When you first start out on your Curly Girl journey, you may find that your hair is in bad condition.
This stems from years of using sulfate shampoos, straighteners, curling irons, etc. and your hair simply needs time to repair itself.
I would thoroughly recommend that you deep condition once a week to begin with as you’ll see results much faster.
A weekly deep condition will not only invigorate your curls but it will encourage shine, bounce, and healthy hair growth.
When Should I Deep Condition?
You can deep condition after doing a co-wash and leave the deep conditioner in for about 30 minutes before moving on to plopping or adding gel.
Deep condition once a week for best results.
Which UK Deep Conditioners Can I Use On The Curly Girl Method?
There are lots of Curly Girl approved deep conditioners available to buy in the UK and I have several favorites:
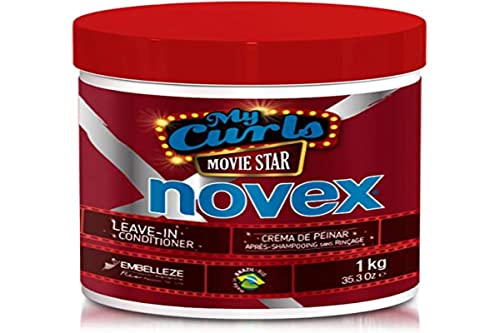
Novex My Curls Movie Star Hair Mask
The Novex My Curls Movie Star Hair Mask is a firm favorite.
Not only because it is a great hydrating mask enriched with Argan, Coconut, and Oil Oil but you also get a whole kilo of product for a very affordable price.
This means you can use this deep conditioner once a week for several months without breaking the bank!

Bouclème Intensive Moisture Treatment
The Bouclème Intensive Moisture Treatment is a very popular deep conditioner amongst the Curly Girl community.
It was designed to protect hair against environmental stressors while enhancing curl definition.
It helps rebalance moisture levels and it is 97% naturally derived.

Shea Moisture Jamaican Black Castor Oil Strengthen and Restore Leave-In Conditioner
Shea products are perfect for CGM and the Shea Moisture Jamaican Black Castor Oil Strengthen and Restore Leave-In Conditioner is not only one of my own favorites but a huge hit with the CG community.
It is a reparative leave-in conditioner that softens and detangles hair and contains Shea butter for additional moisture. A really great deep conditioner if you’re just starting out on the Curly Girl Method.
How To Deep Condition
The first step is of course to find a conditioner that is right for your hair. The key is to figure out whether you need more protein or moisture as the two are very different.
If your hair is protein sensitive, you will most likely experience your hair feeling dry and straw-like, no matter how much you condition it.
This could be a sign that you need to switch to a conditioner with no protein. Avoid coconut and ingredients such as keratin or any that start with Cocodimonium hydroxypropyl.
If your hair is overhydrated, you will need more protein. In this case, your hair is likely limp, a bit dry and your curls have stopped forming.
Try these Curly Girl approved protein products.
Instructions
- Co-wash your hair as per usual.
- Add a handful sized amount of conditioner to your wet hair
- Wrap your hair in a microfiber towel or cling film
- Leave for up to 30 minutes and then rinse your hair and style as per usual
Now, one of the fundamental rules of the Curly Girl Method is of course no heated styling.
However, when deep conditioning, heat is actually our friend as it opens up the hair cuticles and lets the product to its magic.
If you want to speed up the process of deep conditioning, I thoroughly recommend that you get yourself a deep conditioning cap.
It’s an incredibly useful tool that lets you deep condition without the fuss and my favorite is the MQUPIN Deep Conditioning Heat Cap that I got from Amazon. I love deep conditioning caps so much that I actually wrote a whole post about their benefits here.
Refresh
A refresh is a process of ‘refreshing’ your curls on days 2, 3, 4, etc. Some curly girls refresh every two days and some can go a week before needing to co-wash.
At the beginning of your curly journey, you may find that you don’t like refreshing as your curls are not yet healthy enough without the whole wash routine.
That is certainly how I felt and it took me many months before I attempted a refresh.
However, if you care for your curls correctly, you’ll soon find that you can save an awful lot of time by refreshing and money too since you won’t be washing your hair every day.
There are honestly hundreds of ways to do a refresh, but I will share with you my top 3.
These are simple, quick, and cheap and all you need is to figure out which one you prefer best.
Refresh method 1
- Mix a small amount of conditioner with water in a spray bottle and shake vigorously.
- Spray your morning curls with the solution until fairly wet.
- Flip your hair upside down and scrunch your curls.
- If you find your curls are not holding well, add a bit of hair gel
- Finally, let air dry or diffuse
Refresh method 2
- Wet your hair so that it feels towel dry
- Apply a small amount of gel to your hands and rub your palms together
- Flip your hair upside down and use the praying method to apply gel
- Scrunch out your curls
- Air dry or diffuse
Refresh method 3
- Wet hair so that it feels towel dry
- Apply a small amount of gel to your hands and rub your palms together
- Flip your hair upside down and use the praying method to apply gel
- Apply a generous amount of mousse to your curls to create better hold
- Air dry or diffuse


Frequently Asked Questions
What About Low Poo Shampoo?
Low poo essentially means a sulfate-free shampoo and the market is saturated with them.
The problem with low poo shampoos is that although they are sulfate-free, the manufacturers have added additional chemicals to make the product lather.
The additional chemicals can be even more harmful than sulfates so you do not want to use any product which lathers.
Should I Do A Final Wash?
You may have heard of doing a final wash with your regular products so that your hair is clean and ready to receive the wondrous effects of the Curly Girl Method.
This is not recommended.
Why? Because you’ll just be delaying your journey by an extra wash. There’s simply no point.
Regular shampoo and conditioner will never aid in the repair of your curls so just start right away with a co-wash.
How Often Should You Co-wash?
There are no set rules as to how often you should co-wash on the Curly Girl Method.
Some people experience a lot of build-up depending on the products they use, and some find that they can go a full week if not more without having to do a wash.
And there you have it. This is the very basics of the Curly Girl Method and if you live in the UK, there should be no reason why you can’t find the products just right for you.
Remember: This is a process. There is no perfect Curly Girl Method. It’s your method to adapt and perfect.
You may need one handful of conditioner, you may need two.
You may need to squish to condish for four minutes while your best friend only has to do it for 30 seconds.
My best advice is simply to start. If it doesn’t feel right, well then you’re only one wash away from trying again!
Good luck!
Disclaimer: This site is not intended to provide professional or medical advice. All of the content on LovedByCurls.com is for informational purposes only. All advice should be followed at your own discretion. Ingredients may change at any time so always check the product label before using. Check our full disclaimer policy here.
I have been searching for days for an easy to follow, basic guide to how on earth to start the CG method. This is exactly it! Thank you for writing – it reads easily and makes a lot of sense!
Thank you so much! 🙂
Thank you! I was getting so confused but this is really clear. I appreciate you sharing your wisdom.
You are an angel!! I’ve just started out on my curly girl journey after years of straightening my hair. I was getting so confused with all the different terminology I almost gave up till I found this. I’m soooo grateful you took the time to do this ❤️❤️
Thank you so much for your comments! 🙂